Quantcast
Channel: em13c – DBA Kevlar
Viewing all 31 articles
Browse latest View live

A Tip for Upgrading to Enterprise Manager 13c

$
0
0

I’m thrilled to see the outpouring of support for EM13c already out with it just being announced on Friday!  As technologists all over the world jump in and start installing the newest and greatest version of Enterprise Manager, there is a second group already working on the task of upgrading their existing EM12c environments, (seen a few already, including one from Gokhan!)

13c_cc1

Along with other requirements, like setting optimizer_adaptive_features set to false, there is pre-requisite that I’d like to recommend that everyone perform on any EM12c environment before endeavoring on an upgrade-  do a health check with EM Diagnostics.

Enterprise Manager 12c has been out for four years now.  Although few have had them in production as long as I or a handful of other folks, these environments rarely receive the attention that we give our other production databases and applications.  Due to this, spend a little time ensuring that your environment is ready to upgrade before embarking on the upgrade itself, saving the scramble of work that would be required in the midst of an upgrade and/or a failed upgrade if something was missed.

To perform this, first download and install the latest EM Diagnostic kit using the Oracle Master Note 421053.1.

After installation, simple run a full collection on the environment by running the following command and you will do this from the command line:

$ repvfy diag all

The following diagnostic data will be collected:

  • A “Just the Facts” sweep to tell you if and what problems exist.
  • System reports, including environment, performance and space report
  • More specific sub-system health_report, (crucial as the upgrade will be touching all of this.)
    • loader_health
    • ping_health
    • job_health
  • Performance oriented reports, (what is the current state of the EM health)
    • advisors – awr info
    • user dump
    • backlog report

If you’d like to know more about how to use the EM Diagnostics kit, there’s a great support document, (I’ve named it Werner DeGruyter’s third favorite hobby. You’ll have to ask him about his first two favorites.. :)) 1374945.1.

With that, keep having a great time with the new release and Merry Christmas and Happy Em’ing!


Tags:  ,

Del.icio.us
Facebook
TweetThis
Digg
StumbleUpon


Copyright © DBA Kevlar [A Tip for Upgrading to Enterprise Manager 13c], All Right Reserved. 2016.

Installing a New Enterprise Manager 13c Environment

$
0
0

As I patiently wait for approvals to post my Oracle Management Cloud blog posts, I thought I would just post on Enterprise Manager 13c and answer questions that have been posed to me via email and comments.

Is there anything new I need to watch for as I install EM13c?

  1. Your management repository database should be a single-tenant 12.1.0.2 database.
  2. Disable adaptive_features parameter in the database you will use for your repository.
  3. Update the /etc/security/limits.conf file to set soft nofiles to 30000 from previous common setting of 8192
  4. session_cached_cursors parameter should be set to 500
  5. Even though it may warn you on port settings, you’ll note that your settings may contain the range that was requested.  You can disregard this and the installation will allow you to ignore and proceed.

eminstall_port

What kind of space allocation should I have for the software library and $AGENT_HOME?

  1. If you plan on using patch plans and simplify upgrades, your software library should have at least 100G of space.  For large EM environments, we easily recommend 250-500G for the software library.
  2. If you decide to implement an AWR Warehouse, the $AGENT_HOME is the location for the dump files of AWR data that is then pushed to the AWR Warehouse host.  These files could be anywhere between 50M-11G.  Ensure you have the space for theses or failures in ETL processing could occur.

Is there anything in the install that frustrates people?

  1. The percentage of install completion vs. the disbursement of time. Any EM Administrator is quite used to this, but for anyone unfamiliar with EM installations, the install stalls at about 46% and it can lead them to panic.

eminstall_46

^ This is when you go out for lunch, maybe a long one….

eminstall_49

^ Back from lunch, but until we get to about 52%, it could be awhile.  Time to go get an after-lunch coffee! :)  
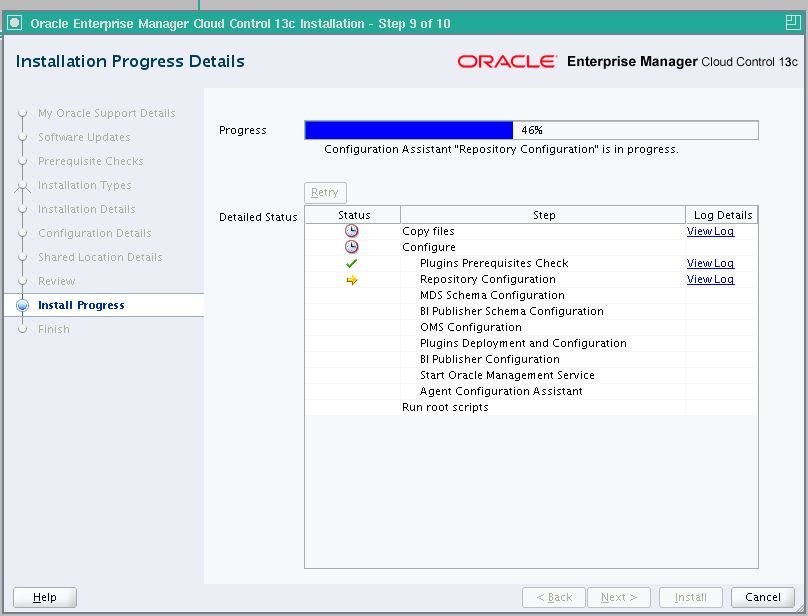
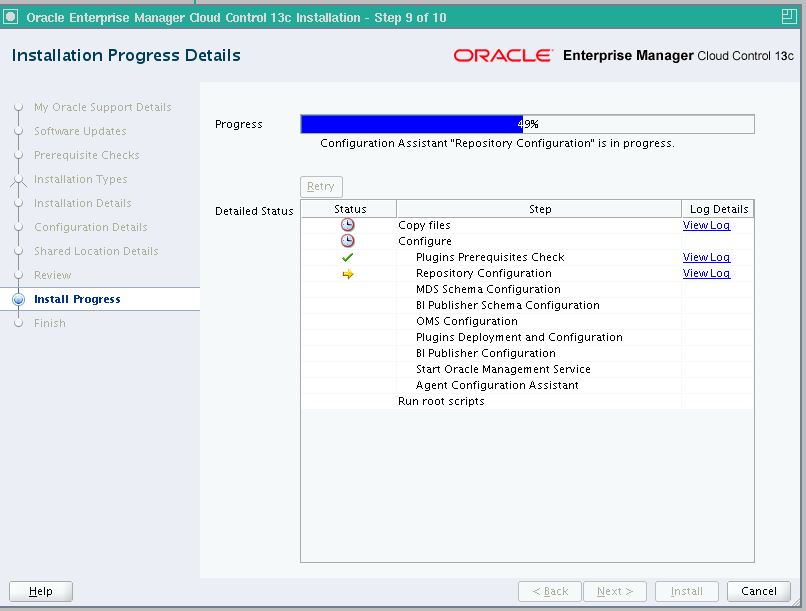
Just know that from 46% till after 50%, its takes a while to get everything compiled and configured, so don’t get frustrated and think it’s hung.  Its just got a lot of work to do during this time.

There are already a number of posts on what’s new and how to perform and install, so I’m going to keep this short, but hopefully valuable to those that are looking to install it for the first time or just looking for a few pointers.


Tags:  ,

Del.icio.us
Facebook
TweetThis
Digg
StumbleUpon


Copyright © DBA Kevlar [Installing a New Enterprise Manager 13c Environment], All Right Reserved. 2016.

Adding Targets in Enterprise Manager 13c

$
0
0

The only thing that is constant is change.

There were some major changes to Enterprise Manager with 13c and many of them may seem small to someone who knows the product well, but then again, it may trip you up as you’re accustomed to features working as you knew them in EM12c.  One of these features is the manual edition of targets through the guided process.

Adding a Target 

The Setup menu is still on the right, it just has some company now in the new EM13c interface:

addtarget5

Click on Setup, Add Target, Add Targets Manually. This is where the guided process looks just a bit different than in EM12c:

addtarget1

We’re going to focus on the second two options, Adding a target via the Guided Process and adding a target Declaratively.

Using the Guided Process

Click on the button for Add Using Guided Process.  This process assumes you’re already added the host the target resides on and can be used to add a myriad of target types, including databases, clusters, engineered systems, middleware, along with all the support target types for any of these.

addtarget2

As you can see from the list shown above, there are a ton of target types supported out of the box, but if you don’t see the target type you require, then it may need to be downloaded and added to the repository.

For our example, we’ll keep it simple and just have the EM add the standard target types for a database host target.  You can only choose one guided discovery type at a time, so if you have a host that is used for more, (let’s say it also have the Oracle BI Suite residing on it)  you will need to perform that guided discovery separate from this one.

After choosing what you want to add, the guided process will ask you what target host you want it to search for the target types on.

adddtarget3

Click on the magnifying glass to choose a target host or hosts from the list, (this is where you can choose more than one!)  You can also add Discovery Options, which are hints to help the discovery.  One of the most useful is the ability to extend the timeout on the discovery search.  If you have a network that has an issue with waits, or the discovery failed on time out the first time, you can add discovery_timeout=<in seconds>, which will change the duration till the timeout in the discovery.

addtarget4

The discovery will locate all targets that meet the criteria.  Update any monitoring usernames and enter the passwords for any of the monitoring requirements.  DBSNMP is the user required by default, so if you want to use this login, ensure it’s not locked and you’ve reset it to a secure password.

Once successful, SAVE the configuration and you’re finished.

Adding a Target Declaratively

The third option in the manual addition is the adding a target using the declarative method.

de·clar·a·tive  /diˈklerətiv/   adjective

Definition, COMPUTING:

denoting high-level programming languages that can be used to solve problems without requiring the programmer to specify an exact procedure to be followed.

Just as the definition shows, this type of target addition is one that allows Enterprise Manager to discover based off a small amount of information offered it.

addtargets9

After clicking on Add Target Declaratively, select the host you want to discover on and the the target type you want Enterprise Manager to search for.

addtargets6

Again, we’ll choose a database instance.  Notice that declarative is best used when you’re looking for one target type, not a group that would commonly find included on a target host.  In the top area, you can name the target name and since this is an database instance, we also have a database system to name.  The name can be a clear and descriptive name, not dependent on the actual SID.

addtargets7

Fill in the information requested, including the username to monitor, password, Oracle home, port and database SID.  You can also use the connection string to discover via a simple Listener pass.

Once you’ve filled the information for the connection, click on Test Connection to verify that it will succeed.

addtargets8

Once its successful, click on Next and complete the target addition.

Not too many changes, but it always helps to be taken through those small changes to see how they can make a great product even better.


Tags:  , ,

Del.icio.us
Facebook
TweetThis
Digg
StumbleUpon


Copyright © DBA Kevlar [Adding Targets in Enterprise Manager 13c], All Right Reserved. 2016.

Enterprise Manager Processes, EM12c vs. EM13c

$
0
0

To assist users as they plan out their upgrades and new Enterprise Manager environments, I wanted to go over a few subtle, but important changes from EM12c, 12.1.0.5 to the newest release, the much anticipated EM13c, 13.1.0.0.

em13c_splash

EM Processes

One of the things you’ll notice when starting an EM12c from the command line is WHAT is started.

$ ./emctl start oms
Oracle Enterprise Manager Cloud Control 12c Release 5
Copyright (c) 1996, 2015 Oracle Corporation. All rights reserved.
Starting Oracle Management Server...
Starting WebTier...
WebTier Successfully Started
Oracle Management Server Successfully Started
Oracle Management Server is Up

The Oracle Management Repository, (aka OMR, the database) has been started separately, along with the listener for the connection to the OMR, but upon issuing the startup command for the OMS, there are steps that are followed in a default installation:

  • OMS, (Oracle Management Service)
  • Weblogic, (Webtier)
  • The Node Manager and a few other necessary components behind the scenes.

You’ll also note that as of 12.1.0.4 with the latest patch and 12.1.0.5, the agent on the OMR host is started automatically:

$ ./emctl start agent
Oracle Enterprise Manager Cloud Control 12c Release 5
Copyright (c) 1996, 2015 Oracle Corporation. All rights reserved.
Agent is already running

Now, with Enterprise Manager 13c, there are a few more processes and checks that are done as part of the start up:

$ ./emctl start oms
Oracle Enterprise Manager Cloud Control 13c Release 1
Copyright (c) 1996, 2015 Oracle Corporation. All rights reserved.
Starting Oracle Management Server...
WebTier Successfully Started
Oracle Management Server Successfully Started
Oracle Management Server is Up
JVMD Engine is Up
Starting BI Publisher Server ...
BI Publisher Server Successfully Started
BI Publisher Server is Up

These two new processes are well known to EM Administrators, but you didn’t see them incorporated into the start up step.

You can see the steps for all the processes started as part of the “emctl start oms” in the $OMS_HOME/gc_inst/em/EMGC_OMS1/sysman/log/emctl.log

2016-01-21 17:26:42,077 [main] INFO commands.BaseCommand logAndPrint.653 - Oracle Management Server is Up
2016-01-21 17:26:42,078 [main] INFO commands.BaseCommand printMessage.413 - statusOMS finished with result: 0
2016-01-21 17:26:42,094 [main] INFO ctrl_extn.EmctlCtrlExtnLoader logp.251 - Extensions found: 1
2016-01-21 17:26:42,095 [main] INFO ctrl_extn.EmctlCtrlExtnLoader logp.251 - Executing callback for extensible_sample
2016-01-21 17:26:42,095 [main] INFO ctrl_extn.EmctlCtrlExtnLoader logp.251 - jar is /u01/app/oracle/13c/plugins/oracle.sysman.emas.oms.plugin_13.1.1.0.0/archives/jvmd/em-engines-emctl.jar; class is oracle.sysman.emctl.jvmd.JVMDEmctlStatusImpl
2016-01-21 17:26:42,200 [main] INFO ctrl_extn.EmctlCtrlExtnLoader logp.251 - rsp is 0 message is JVMD Engine is Up
2016-01-21 17:26:42,200 [main] INFO commands.BaseCommand printMessage.426 - extensible_sample rsp is 0 message is JVMD Engine is Up
2016-01-21 17:26:42,201 [main] INFO commands.BaseCommand logAndPrint.653 - JVMD Engine is Up
2016-01-21 17:26:42,242 [main] INFO commands.BaseCommand logAndPrint.653 - BI Publisher Server is Up

The JVMD, JVM Diagnostics, is now part of the EM infrastructure.  Considering how important java heap knowledge is to tuning your EM environment, it makes complete sense that this is now included with the processing of an EM weblogic host.

There’s a number of new diagnostic reports and health dashboards to assist with ensuring your EM environment retains a healthy performance.

bip13c.

Logs

Along with the important emctl.log, there are some new logs in the sysman logs directory that weren’t there before:

  • emoms_pbs* -Trace and log files for starting worker threads and other background processes.
  • pafLogs  – Not sure, but think this is a sub-directory for plugin logs.  Still researching this one.**
  • jvmdlogs -Directory for JVMD logs
  • syncopss.log -Security log for synchronization with Wallet

**Thank you to Andrew Bulloch: “pafLogs – these are the log files and outputs from the Provisioning and Automation Framework (PAF).  That’s typically DP’s (Deployment Procedures), and other automation tasks that the OMS and, more specifically, the jobs subsystem/tasks subsystem used internally.Resource and Space Usage”

The EM Administrator may want to know, how much user memory is used, upon installation, (not counting heavy activity, plugins, etc.) is used by the added components.

A 12.1.0.5 installation, OMS, OMR with webtier can be tracked with the following when running as a unique user:

ps aux | awk '{arr[$1]+=$4}; END {for (i in arr) {print i,arr[i]}}' | sort -k2

86Mb

For 13.1.0.0, the usage was about 50% higher, (for the basic load, no additional targets or collections occurring):

133Mb

So not much of a difference to start these processes and have them available in the background for reporting and java diagnostic support.

Space required for the OMS_HOME, (sans the logs, GC_INST and the AGENT_HOME) is different as well:

12.1.0.5:  12Gb

13.1.0.0:  14Gb

The Agent has a lot more work to do in the EM13c release and this is why you’ll note I separated the size requirements for releases:

12.1.0.5: 1Gb

13.1.0.0: 3Gb

So there you have it.  A little more background info about EM13c that should assist you in planning for your upcoming upgrade or new environment!


Tags:  ,

Del.icio.us
Facebook
TweetThis
Digg
StumbleUpon


Copyright © DBA Kevlar [Enterprise Manager Processes, EM12c vs. EM13c], All Right Reserved. 2016.

Displaying CPU Graphs For Different Time Ranges in Enterprise Manager

$
0
0

This question was posted in Twitter from @matvarsh30, who asked, “How can I display CPU usage over different periods of time for databases in Enterprise Manager?”

Everyone loves their trusty Top Activity, but the product’s functionality is limited when it comes to custom views and this is what our user had run into. There are numerous ways to display this data, but I’m going to focus on one of my favorite features in the product that was created to replace Top Activity, ASH Analytics.

Retaining AWR Data for ASH Analtyics

Note: This process to display CPU graphs will work for EM12c and EM13c.  Other than the location of the target menu, not much else has changed.

The default display is for one hour and as ASH Analytics is dependent upon AWR data, so although 8 days of detailed information is easy, it is important that you set your retention in the source, (target) databases appropriately to ensure you’re able to view and or research past the default 8 day retention of AWR in any database.  I am a firm believer that if you have the diagnostic and tuning pack for your EE databases, you should be getting the most out of these tools and up the retention time from the default by running the following command via SQL*Plus with the appropriate privileges:

BEGIN
  DBMS_WORKLOAD_REPOSITORY.modify_snapshot_settings(
    retention => 86400,        -- In minutes, 86400 is 60 days
    interval  => 30);          -- In minutes, only change from 60 if doing workload tests, etc. 60 min interval is sufficient.
END;
/

Now you have not just the EM metric data that rolls up, but the AWR data for ASH Analytics to do deep analysis and reporting.

With this in place, let’s create some graphs that answer the question – “How do I display CPU usage for a database over one week, 10 days, 30 days, 60 days?”

Default to Power User View

Once logged into any database, you can access ASH Analytics from the Performance drop down.  If you have an 11g or earlier database, you may have to install the package to create the EMCC views, but this will need to be done to utilize this powerful tool in Enterprise Manager.  ASH Analytics works in databases version 10.2.0.4.0 and above.

Logging into ASH Analytics will display data for the instance based off one hour, but to change to a one week view, you’ll simply click on “Week” and then move the displayed view for the bottom section graph out to encompass the entire week:

ashan1

Using this example, you can then see that I’m now showing a similar graph to Top Activity, but for a whole week and without the aggregation that Top Activity some times suffers from.

ashan2

We’re not going to stick with this view though.  Leaving it on “Activity”, click on Wait Class and go to Resource Consumption and click on Wait Event, (it’s on Wait Class by default.)

As you can see on the right side, there is an overlap in the legend that needs to be fixed, (I’ll submit an ER for it, I promise!)  but luckily, we’re focused on CPU and we all know, in EM, CPU is green!

ashan4

When we highlight the green, it turns a bright yellow.  Now that you have chosen this by hovering your cursor over it, double click to choose it.  The graph will now update to display CPU:

ashan5

You now possess a graph that displays all CPU usage for over the last week vs. total wait classes.  You can see the overall percentage of activity in the left hand side table and on the right bottom is even displayed by top user sessions.  You can also see the total CPU cores for the machine, which can offer a clear perspective on how CPU resources are being used.

Now you may want to see this data without the “white noise”.  We can uncheck the “Total Activity” box to remove this information and only display CPU:

ashan6

We could also choose to remove the CPU Cores and just display what is being used:

ashan7

By removing the top core info, we see the patterns of usage and just cores used much clearer. We could also decide we want to view all the wait classes again, without the CPU Cores or Total Activity.  The only drawback is the overlap in the legend, (I so hate this bug in the browser display….)ashan8

Now, as requested, how would you do this for 10, 30 and 60 days?  As noted in the top view, you note that you’re offered a view by hour, day, week, month and custom.  As many months have 31 days in them, you may choose to do custom view for all three of those requests, but a custom request is quite simple:

ashan9

Yep, just put in your dates that you request and then click OK.  If you have already stretched your window to beginning to end on the lower view, don’t be surprised if it retains this view and shows you all the data, but yes, all of it will display, that is if your example database was active during that time… :)  Yes, the database I chose, as it’s from one of our Oracle test environments was pretty inactive during the Christmas and January time period.

ashan10

And that’s how you create custom CPU activity reports in ASH Analtyics in Enterprise Manager!


Tags:  , , , , ,

Del.icio.us
Facebook
TweetThis
Digg
StumbleUpon


Copyright © DBA Kevlar [Displaying CPU Graphs For Different Time Ranges in Enterprise Manager], All Right Reserved. 2016.

Enterprise Manager 13c, System Broadcast

$
0
0

I thought this was kind of a cool feature- the ability to send a message to appear to specific or all users in the Cloud Control Console.  I have to admit that I used to like a similar feature in Microsoft/MSSQL to send network broadcast messages to desktops that offered one more way to get information to users that they might be less inclined to miss.

em_sysbroad

Anyone who’s already deployed/upgraded to Enterprise Manager 13c and wanted to search how to use this feature, it’s not well documented, so I’m going to blog about it and hopefully that will assist those that would like to put this great little feature to use.

First off, know that the broadcast message is issued by the administrator from the Enterprise Manager command line, (EMCLI.)  There isn’t a current cloud control interface mechanism to perform this.

If you look in the documentation, you’ll most likely search, (like I did) for a verb that has a naming convention of %broadcast%, but came up with nothing.  The reason you can’t find anything is that the verb is wrong in the docs and I’ve submitted a document bug to have this corrected, (thanks to Pete Sharman who had a previous example of the execution, so realized it didn’t match what he had in his examples…)

In the docs, you’ll find the entry for this under the verb: publish_message

The correct verb for this feature is: send_system_broadcast

I ended up pinging Pete because I was concerned that the verb didn’t exist and it took a search for the right key word to find it after dumping out all the EMCLI verbs to a text file. Its a good idea to know how to do this, simply type in the following to gather all the verbs from the library and redirect them to a file that’s easier to parse through with an editor:

$ ./emcli help > emcli.list

You can then view this list and in it, you’ll find the correct verb name:

System Broadcast Verbs
send_system_broadcast — Send a System Broadcast to users logged into the UI

Once you know the verb, then you can request detailed information from the EMCLI verb help command:

$ ./emcli help send_system_broadcast
 emcli send_system_broadcast
 -toOption="ALL|SPECIFIC"
 [-to="comma separated user names"]
 [-messageType="INFO|CONF|WARN|ERROR|FATAL" (default is INFO)]
 -message="message details"
Options:
 -toOption
 Enter the value ALL to send to all users logged into the Enterprise Manager UI enter SPECIFIC to send to a specific EM User
 -to
 Comma separated list of users. This is only used if -toOption
 is SPECIFIC
 -messageType
 Type of System Broadcast, it can be one of following types
 INFO|CONF|WARN|ERROR|FATAL
 -message
 Message that needs to be sent in the System Broadcast. It must have a maximum of 200 characters.

EM CLI verbs can be issued two different ways, as a single command from the host command line interface or internal to the EM CLI utility.  For the command to execute successfully, the login into the EM CLI must be performed, otherwise, you’ll receive an unauthorized error like the one below:

$ ./emcli send_system_broadcast -toOption="ALL" -message="System Maintenance, 6pm"
 Status:Unauthorized 401
$ ./emcli login -username=sysman
 Enter password :

Login successful
$ ./emcli send_system_broadcast -toOption="ALL" -messageType="WARN" -message="System Maintenance, 6pm"
 Successfully requested to send System Broadcast to users.

Note: If you upgraded your EM12c to EM13c, ensure you syncronize your CLI library before attempting using a new verb from the 13c library, too.

I wasn’t as satisfied with the internal CLI utility.  The error messages weren’t as helpful as when it was issued by the command line and then there were odd ones like below:

 emcli>send_system_broadcast (
 ... toOption="ALL"
 ... ,messageType="WARN"
 ... ,message="Applying EM Patch at 6pm MST, 3/1/2016"
 ... )
 com.sun.jersey.api.client.ClientHandlerException: oracle.sysman.emCLI.omsbrowser.OMSBrowserException

So I found that issuing it from the host command line offered much better results:

$ ./emcli send_system_broadcast -toOption="ALL" -message="Testing"
 Successfully requested to send System Broadcast to users.
 
$ ./emcli send_system_broadcast -toOption="ALL" -messageType="WARN" -message="Hello EM Users, Maintenance Outage at 6pm MST"
 Successfully requested to send System Broadcast to users.

The message shows at the top right of the screen and will continue to be displayed until the user clicks on Close-

sysbroadcast2

Now, not that I’m advocating sending bogus or silly messages, but you can have some fun with this feature and send messages to unique users using the specific to option and call to any EMCC user:

$./emcli send_system_broadcast  -toOption="SPECIFIC" -to="KPOTVIN" -messageType="WARN" -message="Get off my EM13c Console, NOW!!"

What does the message look like?

sysbroadcast

And no, you can’t send a specific user message to the SYSMAN user:

Following users are inactive/invalid. Cannot send System Broadcast to them: sysman.

Mean ol’ Enterprise Manager… :)


Tags:  ,

Del.icio.us
Facebook
TweetThis
Digg
StumbleUpon


Copyright © DBA Kevlar [Enterprise Manager 13c, System Broadcast], All Right Reserved. 2016.

AWR Warehouse Jobs in EM13c

$
0
0

As I’m playing with the AWR Warehouse in EM13c, I noticed a few changes that may send up a red flag and wanted to assist in removing those.  As many know, the AWR Warehouse is very dependent upon EM Jobs…even more so now that we’ve moved to EM13c.  The EM Job System has gone through quite an overhaul, so let’s go through how this may impact what you’re common to seeing when adding a database to the AWR Warehouse.

reality-edited1

Discovery

After adding a database to the AWR Warehouse in EM13c, you’ll note within just a few minutes, the database will come up in the console as not uploading snapshots, which can alarm those that monitor this feature.

awrw_13c

Now in the previous, EM12c, this was a sign that something was missing in the configuration, not enough space for the AWR snapshot dump files in the $AGENT_HOME directory or preferred credentials not set up.  The quickest way to troubleshoot it would be to highlight the database in question and click on Actions –> Upload Snapshots Now.  This results in a job that runs from beginning to finish, skipping all DBMS local jobs and having the logging be performed via the EM Job System, making it easy to monitor the progress.

Now the latter is still in place.  The jobs still log the process and perform all steps via an EM Job, but there is something that I’ll show you as we go through these steps in traditional troubleshooting.

Manual Power

Let’s say we did run the manual “Upload Snapshots Now”.  We would then proceed to Job Activity to view the job and the status of each step:

awrw_job_page

We can quickly notice our CAW, (Centralized AWR Warehouse) job for the Run ETL Now, or CAW_RUN_ETL_NOW and we’ll click on it to view it’s progress, as it’s actively running.

awrw_job

We can see in the left hand screen that the extract from the source database is executing and in the right, we can now see the log.  This is a more efficient view than the previous EM12c job screen that required a click on tabs and a refresh of the complete screen to process an updated view.

awrw_job2

We can highlight each step to see Elapsed Time for the process and see what timestamps are stated for the start and end time.  The completion graph shows us the amount of time resourced to each step in the process, too.

awrw_job3

And we can see that the job has completed successfully, otherwise any step failure would show a red “X” and we can dig into the job details or download the log if we want.  If you notice, up at the top right, you can switch to Classic View, but I’m not sure why anyone would want to.  The new Job System is easier to work with, as well as monitor jobs with.

Observation

Now, how many of you noticed that there were TWO OTHER jobs back on the job list with a naming convention of CAW*?  Yes, that’s the key to this challenge.  Even though our job does speed up the AWR snapshot loads and then ensures that the data is available immediately, the real reason the databases were shown as “Without Recent Uploads” is that the jobs are scheduled for outside business hours for it’s initial load.

awrw_job_page

This means, that in the morning, the database shown as out of date would be caught up, but it’s not an immediate job system run as the job isn’t going to start until 5:53PM for the timezone of the EM environment.

Summary

So what you learned from this post is-

  1. A database added to the AWR Warehouse won’t load immediately and you should look at your jobs scheduled in the next 24 hrs with a CAW* naming convention to estimate time of availability.
  2. You can load the data immediately by clicking on the database, click on Actions and “Upload Snapshots Now.”
  3. The error handling in the EM Job System is still the best first step to troubleshoot any AWR Warehouse extract, transfer and load issues.
  4. The Enhancements to the Enterprise Manager 13c Job System ROCKS!


Tags:  ,

Del.icio.us
Facebook
TweetThis
Digg
StumbleUpon


Copyright © DBA Kevlar [AWR Warehouse Jobs in EM13c], All Right Reserved. 2016.

EM13c DBaaS, Part 1 On-Premise and the Test Master

$
0
0

With EM13c, DBaaS has never been easier.  No matter if you’re solution is on-premise, hybrid, (on-premise to the cloud and back) or all cloud, you’ll find that the ability to take on DevOps challenges and ease the demands on you as the DBA is viewed as the source of much of the contention.

too easy

On-Premise Cloning

In EM13c, on- premise clones have been built in by default and easier to manage than they were before.  The one pre-requisite I’ll ask of you is that you set up your database and host preferred credentials for the location you’ll be creating any databases to.  After logging into our the EMCC and going to our Database Home Page, we can choose a database that we’d like to clone.  There are a number of different kinds of clones-

  • Full Clones from RMAN Backups, standby, etc.
  • Thin Clones with or without a test master database
  • CloneDB for DB12c

For this example, we’ll take advantage of a thin clone, so a little setup will be in order, but as you’ll see, it’s so easy, that it’s just crazy not to take advantage of the space savings that can be offered with a thin clone.

What is a Thin Clone?

A thin clone is a virtual copy of a database that in DevOps terms, uses a test master database, a full copy of the source database, as a “conduit” to then create unlimited number of thin clone databases that save up to 90% on storage requirements separate full clone for each would need.

testmaster

One of the cool features of a test master is that you can perform data masking on the test master so that there is no release of sensitive production data to the clones.  You also have the ability to rewind or in other words, let’s say, a tester is doing some high risk testing on an thin clone and gets to a point of no return.  Instead of asking for a new clone, they can simply rewind to a snapshot in time before the issue that caused the problem occurred.  Very cool stuff…. :)

Creating a Test Master Database

From our list of databases in cloud control, we can right click on the database that we want to clone and proceed to create a test master database for it:

clone2

The wizard will take us through the proper steps to perform to create the test master properly.  This test master will reside on an on-premise host, so no need for a cloud resource pool.

clone3

As stated earlier, it will pay off if you have your logins set up as preferred credentials.  The wizard will allow you to set those up as “New” credentials, but if there is a failure and they aren’t tested and true, it’s nice to know you already have this out of the way.

Below the Credentials section, you can decide at what point you want to recover from.  It can be at the time the job is deployed or from a point in time.

You have the choice to name your database anything.  I left the default, using the naming convention based off the source, with the addition of tm, for Test Master and the number 1.   If this was a standard database, you might want to make it a RAC or RAC one node.

Then comes the storage.  As this is an on-premise, I chose the same Oracle Home that I’m using for another database on the nyc host and used the same preferred credentials for normal database operations.  You would want to place your test master database on a storage location that would be separate from your production database so as not to create a performance impact.

clone4

The default location for storage of datafiles is offered, but I do have the opportunity to use OFA or ASM for my options.  I can set up Flashback, too.  Whatever listeners are discovered for the host will be offered up and then I can decided on a security model.  Set up the password model that best suits your policies and if you have a larger database to clone, then you may want to up the parallel threads that will be used to create the test master database.  I always caution those that would attempt to max the number out, thinking more means better.  Parallel can be throttled by a number of factors and those should be taken into consideration.  You will find with practice that you find a “sweet spot” for this setting.  In your environment, 8 may be the magic number due to network bandwidth or IO resource limitations.  You may find it can be as high as 32, but do take some time to test out and know your environment.

clone5

Now comes the spfile settings.  You control this and although the defaults spfile for a test master is used here, for a standard clone, you may want to update the settings for a clone to limit the resources allocated for a test or development clone.

Now if you have special scripts that need to be run as part of your old manual process of cloning, you can still add that here.  That includes BEFORE and AFTER the clone.  For the SQL scripts, you need to specify a database user to run the script as, too.

If you started a standard clone and meant to create a test master database, no fear!  You still have the opportunity to change this into a Test Master at this step and you can create a profile to add to your catalog options if you realize that this would be a nice clone process to make repeatable.

clone7

The EM Job that will create the clone is the next step.  You can choose to run it immediately and decide on what kind of notifications you’d like to receive via your EM profile, (remember, the user logged into the EMCC creating this clone is the credentials that will be used for notification….)  You can also choose to perform the clone later.

clone8

The scheduling feature is simple to use, allowing you to choose a date and time that makes the clone job schedule as efficient as possible.

clone9

Next, review the options you’ve chosen and if satisfied, click on Clone.  If not, click on Back and change any options that didn’t meet your expectations.

If you chose to run the job immediately, the progress dashboard will be brought up after clicking Clone.

clone10

Procedure Activity is just another term for an EM Job and you’ll find this job listed in Job Activity.  It’s easier to watch the progress from here and as checkmarks show in the right hand column, the step is completed successfully for your test master or clone.

Once the clone is complete, remember that this new database is not automatically monitored by EM13c unless you’ve set up Automatic Discovery and Automatic Promotion.  If not, you’ll need to manually discover it.  You can do that following this blog post.  Also keep in mind, you need to wait till the clone is finished, so you can set the DBSNMP user status to unlocked/open and ensure the password is secure.

Now that we’ve created our test master database, in the next post, we’ll create a thin clone.


Tags:  , , ,

Del.icio.us
Facebook
TweetThis
Digg
StumbleUpon


Copyright © DBA Kevlar [EM13c DBaaS, Part 1 On-Premise and the Test Master], All Right Reserved. 2016.

HotSos Symposium and IOUG Collaborate 2016

$
0
0

I fly out on Sunday for HotSos and am looking forward to giving a joint keynote with Jeff Smith, as well as giving two brand new sessions on Enterprise Manager New Features.  IOUG’s Collaborate is just a month afterwards, so the spring conference chaos is officially under way.

hotsos16

With running the RMOUG conference, Feb. 9th-11th, I think you can imagine what my response was like when I realized how much content I had to produce for HotSos’ two sessions and then another four for Collaborate, plus a Hands on Lab.

babyscared

As focused as I’ve been on day job demands for a new product, Oracle Management Cloud, which I’m sure you’ve heard of as it goes through trials, I found myself furiously building out everything I needed for my Enterprise Manager 13c environment.  At the same time, we needed to build and test out the HOL container environment and then Brian Spendolini was kind enough to give me access to the Oracle Public Cloud to test out the new Database as a Service with Hybrid Cloud offering.

I know all of it is going to be awesome, but my brain works like a McDonalds with 256 open drive thrus, so until it comes together at the end, I’m sure it looks pretty chaotic.

mcdonalds

With that said, everything is starting to come together, first with HotSos and then with Collaborate, really well.

HotSos Symposium 2016

This will be my fourth year presenting at HotSos Symposium and where other conferences may have mixed content, this is all about performance.  It’s my favorite topic and I really get to discuss the features that I love-  AWR, ASH, EM Metrics, SQL Monitor, AWR Warehouse.  It’s all technical, all the time and I really enjoy the personal feel of the conference that the HotSos group put into it, as well as the quality of the attendees that are there with such a focused objective on what they want to learn.

That Jeff and I are going to do our keynote on Social Media at HotSos really demonstrates the importance of it’s value to a techie career.  Social Media is assumed to be natural to those that are technically fluent and to be honest, it can be a very foreign concept.  Hopefully those in attendance will gain value in professional branding and how it can further their career.

IOUG Collaborate 2016

Collaborate is another conference where I enjoy speaking at immensely.  The session attendance is high, allowing you to reach a large user base and the locations often change from year to year, offering you some place new to visit.  The venue this year is in Las Vegas at the Mandalay.  There’s so much to do during the event that its almost impossible for you to go outside or do something outside the hotel, ( can you call these monstrosities in Las Vegas just a “hotel”? :))  and I know I only went outside once back in 2014 after arriving.

collab

Joe Diemer did a great job putting together a page to locate all the great Enterprise Manager and Oracle Management Cloud content at Collaborate this year.  Make sure to bookmark this and use those links to fulfill your Collaborate scheduler so you don’t miss out on any of it!  This includes incredible presenters and I know I’ll be using it to try and see sessions for a change!

Along with my four technical sessions, I’ll be doing a great HOL with Courtney Llamas and Werner DeGruyter.  We’re updating last year’s session, (OK, we’re pretty much writing a whole new HOL…) to EM13c and we’re going to cover all the latest and coolest new features, so don’t miss out on this great pre-conference hands on lab!

Hopefully I’ll see you either this next week at HotSos or in April at Collaborate!


Tags:  , , ,

Del.icio.us
Facebook
TweetThis
Digg
StumbleUpon


Copyright © DBA Kevlar [HotSos Symposium and IOUG Collaborate 2016], All Right Reserved. 2016.

EM13c DBaaS, Part 2, Thin Clone Issues

$
0
0

I’ve been working on a test environment consisting of multiple containers in a really cool little setup.  The folks that built it create the grand tours for Oracle and were hoping I’d really kick the tires on it, as its a new setup and I’m known for doing major damage to resource consumption… :)  No fear, it didn’t take too long before I ran into an interesting scenario that we’ll call the “Part 2” of my Snap clone posts.

tire

Environment after Kellyn has kicked the tires.

In EM13c, if you run into errors, you need to know how to start to properly troubleshooting and what logs provide the most valuable data.  For a snap or thin clone job, there are some distinct steps you should follow.

The Right Logs in EM13c

The error you receive via the EMCC should direct you first to the OMS management log.  This can be found in the $OMS_BASE/EMGC_OMS1/sysman/log directory.  view the emoms.log first and for the time you issued the clone, there should be some high level information about what happened:


2016-03-01 17:31:04,143 [130::[ACTIVE] ExecuteThread: '16' for queue: 'weblogic.kernel.Default (self-tuning)'] WARN clone.CloneDatabasesModel logp.251 - Error determining whether the database target is enabled for thin provisioning: null

For the example, we can see that our TestMaster is shown that it wasn’t enabled for thin provisioning as part of it’s setup.

If log into EMCC, log into our source database, (BOFA) and then go from Database, Cloning, Clone Management, we can then see that although we had requested this to be a test master database, when I overwhelmed the environment, something went wrong and this full clone hadn’t become a test master for BOFA:

thin_c5

Even though the database that should be the Test Master is visible from the BOFA database Cloning Management page and highlighted, I’m unable to Enable as a Test Master or choose the Remove option.  I could delete it and I’d only be prompted for the credentials needed to perform the process.

delete_db

For this post, we’re going to say that I also was faced with no option to delete the database from the EMCC, too.  Then I’d need to go to the command line interface for EM13c.

EM CLI to the Rescue

As we can’t fix our broken test master view the console, we’ll take care of it with the command line interface, (EM CLI.)

First we need to know information about the database we’re having problems with, so log into the OMR, (Oracle Management Repository, the database behind EM13c)  via SQL*Plus as a user with access to the sysman schema and get the TARGET_GUID for the database in question:

select display_name, target_name, target_guid 
from mgmt_targets where target_name like 'tm1%';
 DISPLAY_NAME
 --------------------------------------------------------------------------------
 TARGET_NAME
 --------------------------------------------------------------------------------
 TARGET_GUID
 --------------------------------
 BOFAtm1_sys
 BOFAtm1_sys
 EF9FC557D210477B439EAC24B0FDA5D9
 
 BOFA_TestMaster-03-01-2016-1
 BOFAtm1
 893EC50F6050B95012EAFA9B7B7EF005


Ignore the system entry and focus on the BOFAtm1.  It’s our target that’s having issues from our Clone Management.

We need to create an entry file with the following parameters to be used by our input file argument-

vi /home/oracle/delete_cln.prop
DB_TARGET_GUID=893EC50F6050B95012EAFA9B7B7EF005
HOST_CREDS=HOST-ORACLE:SYSMAN
HOST_NAME=nyc.oracle.com
ORACLE_BASE=/u01/app/oracle
ORACLE_HOME=/u01/app/oracle/product/12.1.0/dbhome_1
DBNAME=BOFAtm1
DB_SID=BOFAtm1
DB_TARGET_NAME=BOFAtm1

Next, log into the EM CLI as the sysman user, (or if you’ve set up yours with proper EM CLI logins, then use that…)

$ ./emcli login -username=sysman
 Enter password :
Login successful
./emcli delete_database -input_file=data:/home/oracle/delete_cln.prop
Submitting delete database procedure...
2D146F323DB814BAE053027AA8C09DCB
Deployment procedure submitted successfully

Notice the output from the run: “…procedure SUBMITTED successfully”.  This isn’t an instantaneous execution and it will take a short while for the deletion and removal of the datafiles to take place.

There are a ton of EM CLI verbs for creating, managing and automating DBaaS, this is just demonstrating the use of one of them when I ran into an issue due to resource constraints causing a failure on my test environment.  You can find most of them here.

After some investigation of host processes, I noted that the swap was undersized and after resizing, the job completed successfully.


Tags:  ,

Del.icio.us
Facebook
TweetThis
Digg
StumbleUpon


Copyright © DBA Kevlar [EM13c DBaaS, Part 2, Thin Clone Issues], All Right Reserved. 2016.

Hybrid Gateways and the Oracle Public Cloud with EM13c

$
0
0

This is going to be a multi-post series, (I have so many of those going, you’d hope I’d finish one vs. going onto another one and coming back to others, but that’s just how I roll…:))

As I now have access to the Oracle Public Cloud, (OPC) I’m going to start by building out some connectivity to one of my on premise Enterprise Manager 13c environments.  I had some difficulty getting this done, which may sounds strange for someone who’s done projects with EM12c and DBaaS.

fa65f436a4c535257341d334bb62c0b2

Its not THAT hard to do, it’s just locating the proper steps when there are SO many different groups talking about Database as a Service and Hybrid Cloud from Oracle.  In this post, we’re talking the best and greatest one-  Enterprise Manager 13c’s Database as a Service.

Generate Public and Private Keys

This is required for authentication in our cloud environment, so on our Oracle Management Service, (OMS) environment, let’s create our SSH keys as our Oracle user, (or the owner of the OMS installation):

ssh-keygen -b 2048 -t rsa

Choose where you would like to store the support files and choose not to use a passphrase.

Global Named Credential for the Cloud

We’ll then use the ssh key as part of our new named credential that will be configured with our cloud targets.

Click on Setup, Security and then Named Credentials.  Click on Create under the Named Credentials section and then proceed to follow along with these requirements for the SSH secured credential:

opc_em5

Now most instructions will tell you that you need to “Choose File” to load your SSH Private and Public Keys into the Credential properties, but you can choose to open the file and just copy and paste the information into the sections.  It works the same way.  Ensure you choose “Global” for the Scope, as we don’t have a target to assign this to yet.

Once you’ve entered this information in, click on Save, as you won’t be able to test it.  I will tell you, if you don’t paste in ALL of the information from each of the the public and private key file in the properties section, it has checks for the headers and footers that will cause it to send an error, (you can see the “****BEGIN RSA PRIVATE KEY****” and “ssh-rsa” in the ones I pasted into mine.)

Create a Hybrid Cloud Agent

Any existing agent can be used for this step and will then serve two purposes.  It will be both the local host agent, as well as an agent for the cloud, which is why its referred to as a hybrid agent.

We’ll be using EM CLI, (the command line tool for EM) to perform this step.  I’m going to use the OMS’ agent, but I’d commonly recommend using another hosts and create a few to ensure higher availability.

 $ ./emcli login -username=sysman
 Enter password :

Login successful
 $ ./emcli register_hybridgateway_agent -hybridgateway_agent_list='agentname.oracle.com:1830'
 Successfully registered list of agents as hybridgateways.

Make sure to restart the agent after you’re performed this step.  Deployments to the cloud can fail if you haven’t cycled the agent you’ve converted to a hybrid gateway before performing a deployment.

Create Database Services in OPC

Once that’s done, you’ll need to create some services to manage in your OPC, so create a database service to begin.  I have three to test out with my EM13c on premise environment that we’re going to deploy a hybrid agent to.

agent_dep4

Now that we have a couple database services createed, then I’ll need to add the information regarding each new target to the /etc/hosts file on the on premise Enterprise Manager host.

Adding the DNS Information

You can capture this information from your OPC cloud console by clicking the left upper menu, Oracle Compute Cloud Service.

For each service you add, the Oracle Compute Cloud Service provides the information for the DNS entry you’ll need to add to your /etc/hosts file, along with public IP addresses and other pertinent information.

opc_em4

Once you’ve gathered this, then as a user with SUDO privs on your OMS box, add these entries to your hosts file:

$sudo vi /etc/hosts
# ###################################### #
127.0.0.1 localhost.localdomain loghost localhost
IP Address   Host Name    Short Name
So on, and so forth....

Save the changes to the file and that’s all that’s required, otherwise you’ll have to use the IP Addresses for these environments to connect.

Now, let’s use our hybrid gateway agent and deploy to one or more of our new targets on the Oracle Public Cloud.

Manual Target Additions

We’ll add a target manually from the Setup menu, and choose to add a host target:

agent_dep1

We’ll fill out the standard information of agent installation directory, run sudo command, but we’ll also choose to use our cloud credentials we created earlier and then we need to check the box for Optional Details and check mark that we’re going to configure a Hybrid Cloud Agent.  If you’re OS user doesn’t have sudo to root, no problem, you’ll just need to run the root.sh script manually to complete the installation.

agent_dep2

Notice that I have a magnifying glass I can click on and choose the agent that I’ve made my hybrid cloud agent.  One of the tricks  for the proxy port is to remove the default and let the installation deploy to the port that it finds is open.  It eliminates the need to guess and the default isn’t always correct.

Click on Next once you’ve filled out these sections and if satisfied, click on Deploy Agent.  Once complete, the deployment to the cloud is complete.

Next post we’ll discuss the management of cloud targets and hybrid management.


Tags:  , , ,

Del.icio.us
Facebook
TweetThis
Digg
StumbleUpon


Copyright © DBA Kevlar [Hybrid Gateways and the Oracle Public Cloud with EM13c], All Right Reserved. 2016.

Retaining Previous Agent Images, the Why and the How

$
0
0

I appreciate killing two birds with one stone.  I’m all about efficiency and if I can satisfy more than one task with a simple, productive process, then I’m going to do it.  Today, I’m about to:

  1. Show you why you should have a backup copy of previous agent software and how to do this.
  2. Create a documented process to restore previous images of an agent to a target host.
  3. Create the content section for the Collaborate HOL on Gold Images and make it reproducible.
  4. Create a customer demonstration of Gold Agent Image
  5. AND publish a blog post on how to do it all.

igotthis

I have a pristine Enterprise Manager 13c environment that I’m working in.  To “pollute” it with a 12.1.0.5 or earlier agent seems against what anyone would want to do in a real world EM, but there may very well reasons for having to do so:

  1.  A plugin or bug in the EM13c agent requires a previous agent version to be deployed.
  2. A customer wants to see a demo of the EM13c gold agent image and this would require a host being monitored by an older, 12c agent.

Retaining Previous Agent Copies

It would appear to be a simple process.  Let’s say you have the older version of the agent you wish to deploy in your software repository.  You can access the software versions in your software library by clicking on Setup, Extensibility, Self-Update.

extensibl1

Agent Software is the first in our list, so it’s already highlighted, but otherwise, click in the center of the row, where there’s no link and then click on Actions and Open to access the details on what Agent Software you have downloaded to your Software Library.

If you scroll down, considering all the versions of agent there are available, you can see that the 12.1.0.5 agent for Linux is already in the software library.  If we try to deploy it from Cloud Control, we notice that no version is offered, only platform, which means the latest, 13.1.0.0.0 will be deployed, but what if we want to deploy an earlier one?

Silent Deploy of an Agent

The Enterprise Manager Command Line Interface, (EMCLI) offers us a lot more control over what we can request, so let’s try to use the agent from the command line.

Log into the CLI from the OMS host, (or another host with EMCLI installed.)

[oracle@em12 bin]$ ./emcli login -username=sysman
Enter password :
Login successful

First get the information about the agents that are stored in the software library:

[oracle@em12 bin]$ ./emcli get_supportedplatforms
Error: The command name "get_supportedplatforms" is not a recognized command.
Run the "help" command for a list of recognized commands.
You may also need to run the "sync" command to synchronize with the current OMS.
[oracle@em12 bin]$ ./emcli get_supported_platforms
-----------------------------------------------
Version = 12.1.0.5.0
 Platform = Linux x86-64
-----------------------------------------------
Version = 13.1.0.0.0
 Platform = Linux x86-64
-----------------------------------------------
Platforms list displayed successfully.

I already have the 13.1.0.0.0 version.  I want to export the 12.1.0.5.0 to a zip file to be deployed elsewhere:

[oracle@em12 bin]$ ./emcli get_agentimage -destination=/home/oracle/125 -platform="Platform = Linux x86-64" -version=12.1.0.5.0
ERROR:You cannot retrieve an agent image lower than 13.1.0.0.0. Only retrieving an agent image of 13.1.0.0.0 or higher is supported by this command.

OK, so much for that idea!

So what have we learned here?  Use this process to “export” a copy of your previous version of the agent software BEFORE upgrading Enterprise Manager to a new version.

Now, lucky for me, I have multiple EM environments and had an EM 12.1.0.5 to export the agent software from using the steps that I outlined above.  I’ve SCP’d it over to the EM13c to use to deploy and will retain that copy for future endeavors, but remember, we just took care of task number one on our list.

  1.  Show you why you should have a backup copy of previous agent software and how to do this.

Silent Deploy of Previous Agent Software

If we look in our folder, we can see our zip file:

[oracle@osclxc ~]$ ls
 12.1.0.5.0_AgentCore_226.zip 
p20299023_121020_Linux-x86-64.zip
 20299023 p6880880_121010_Linux-x86-64.zip

I’ve already copied it over to the folder I’ll deploy from:

scp 12.1.0.5.0_AgentCore_226.zip oracle@host3.oracle.com:/home/oracle/.

Now I need to upzip it and update the entries in the response file, (agent.rsp)

OMS_HOST=OMShostname.oracle.com
 EM_UPLOAD_PORT=4890 <--get this from running emctl status oms -details
 AGENT_REGISTRATION_PASSWORD=<password> You can set a new one in the EMCC if you don't know this information.
 AGENT_INSTANCE_HOME=/u01/app/oracle/product/agent12c
 AGENT_PORT=3872
 b_startAgent=true
 ORACLE_HOSTNAME=host.oracle.com
 s_agentHomeName=<display name for target>

Now run the shell script, including the argument to ignore the version prerequisite, along with our response file:

$./agentDeploy.sh -ignorePrereqs AGENT_BASE_DIR=/u01/app/oracle/product RESPONSE_FILE=/home/oracle/agent.rsp

The script should deploy the agent successfully, which will result in the end output from the run:

Agent Configuration completed successfully
The following configuration scripts need to be executed as the "root" user.
#!/bin/sh
#Root script to run
 /u01/app/oracle/core/12.1.0.5.0/root.sh
To execute the configuration scripts:
1. Open a terminal window
2. Log in as "root"
3. Run the scripts
Agent Deployment Successful.

Check that an upload is possible and check the status:

[oracle@fs3 bin]$ ./emctl status agent
Oracle Enterprise Manager Cloud Control 12c Release 5
Copyright (c) 1996, 2015 Oracle Corporation. All rights reserved.
---------------------------------------------------------------
Agent Version : 12.1.0.5.0
OMS Version : 13.1.0.0.0
Protocol Version : 12.1.0.1.0
Agent Home : /u01/app/oracle/product/agent12c
Agent Log Directory : /u01/app/oracle/product/agent12c/sysman/log
Agent Binaries : /u01/app/oracle/product/core/12.1.0.5.0
Agent Process ID : 2698
Parent Process ID : 2630

You should see your host in your EM13c environment now.

fs31

OK, that takes care of Number two task:

2.  Create a documented process to restore previous images of an agent to a target host.

Using a Gold Agent Image

From here, we can then demonstrate the EM13c Gold Agent Image effectively.  Click on Setup, Manage Cloud Control, Gold Agent Image:

Now I’ve already created a Gold Agent Image in this post.  Now it’s time to Manage subscriptions, which you can see a link at the center of the page, to the right side.  Click on it and then we need to subscribe hosts by clicking on “Subscribe” and add it to the list, (by using the shift or ctrl key, you can choose more than one at a time.

gai1

As you can see, I’ve added all my agents to the Gold Image Agent as subscriptions and now it will go through and check the version and add it to be managed by the Gold Agent Image.  This includes my new host on the 12.1.0.5.0 agent.  Keep in mind that a blackout is part of this process for each of these agents for them to be added, so be aware of this step as you refresh and monitor the additions.

Once the added host(s) update to show that they’re now available for update, click on the agent you wish to update, (you can choose even one that’s already on the current version…) and click on Update, Current Version.  This will use your Current version gold image that its subscribed to and deploy it via an EM job-

agent_upd

The job will run for a period of time as it checks everything out, deploys the software and updates the agent, including a blackout so as not to alarm everyone as you work on this task. Once complete, the agent will be upgraded to the same release as your gold agent image you created!

gaig

Well, with that step, I believe I’ve taken care of the next three items on my list!  If you’d like to know more about Gold Agent Images, outside of the scenic route I took you on today, check out the Oracle documentation.


Tags:  , ,

Del.icio.us
Facebook
TweetThis
Digg
StumbleUpon


Copyright © DBA Kevlar [Retaining Previous Agent Images, the Why and the How], All Right Reserved. 2016.

AWR Warehouse Fails on Upload- No New Snapshots

$
0
0

This issue can be seen in either EM12c or EM13c AWR Warehouse environments.  It occurs when there is a outage on the AWR Warehouse and/or the source database that is to upload to it.

oh_gif_by_gifsandstock-d4ldoq9

The first indication of the problem, is when databases appear to not have uploaded once the environments are back up and running.

awrw5

The best way to see an upload, from beginning to end is to highlight the database you want to load manually, (click in the center of the row, if you click on the database name, you’ll be taken from the AWR Warehouse to the source database’s performance home page.)  Click on Actions, Upload Snapshots Now.

A job will be submitted and you’ll be aware of it by a notification at the top of the console:

awrw1

Click on the View Job Details and you’ll be taken to the job that will run all steps of the AWR Warehouse ETL-

  1.  Inspect what snapshots are required by comparing the metadata table vs. what ones are in the source database.
  2. Perform a datapump export of those snapshots from the AWR schema and update the metadata tables.
  3. Perform an agent to agent push of the file from the source database server to the AWR Warehouse server.
  4. Run the datapump import of the database data into the AWR Warehouse repository, partitioning by DBID, snapshot ID or a combination of both.
  5. Update support tables in the Warehouse showing status and success.

Now note the steps where metadata and successes are updated.  We’re now inspecting the job that we’re currently running to update our tables, but instead of success, we see the following in the job logs:

awrw2

We can clearly see that the extract, (ETL step on the source database to datapump the AWR data out)  has failed.

Scrolling down to the Output, we can see the detailed log to see the error that was returned on this initial step:

awrw3

ORA-20137: NO NEW SNAPSHOTS TO EXTRACT.

Per the Source database, in step 1, where it compares the database snapshot information to the metadata table, it has returned no new snapshots that should be extracted.  The problem, is that we know on the AWR Warehouse side, (seen in the alerts in section 3 of the console) there are snapshots that haven’t been uploaded in a timely manner.

How to Troubleshoot

First, let’s verify what the AWR Warehouse believes is the last and latest snapshot that was loaded to the warehouse via the ETL:

Log into the AWR Warehouse via SQL*Plus or SQLDeveloper and run the following query, using the CAW_DBID_MAPPING table, which resides in the DBSNMP database:

SQL> select target_name, new_dbid from caw_dbid_mapping;
TARGET_NAME
--------------------------------------------------------------------------------
NEW_DBID
----------
DNT.oracle.com
3695123233
cawr
1054384982
emrep
4106115278

and what’s the max snapshot that I have for the database DNT, the one in question?

SQL> select max(dhs.snap_id) from dba_hist_snapshot dhs, caw_dbid_mapping cdm
2 where dhs.dbid=cdm.new_dbid
3 and cdm.target_name='DNT.oracle.com';
MAX(DHS.SNAP_ID)
----------------
501

The Source

These next steps require querying the source database, as we’ve already verified the latest snapshot in the AWR WArehouse and the error occurred on the source environment, along with where it failed at that step in the ETL process.

Log into the database using SQL*Plus or another query tool.

We will again need privileges to the DBSNMP schema and the DBA_HIST views.

SQL> select table_name from dba_tables
where owner='DBNSMP' and table_name like 'CAW%';
TABLE_NAME
--------------------------------------------------------------------------------
CAW_EXTRACT_PROPERTIES
CAW_EXTRACT_METADATA

These are the two tables that hold information about the AWR Warehouse ETL process in the source database.

There are a number of ways we could inspect the extract data, but the first thing we’ll do is get the last load information from the metadata table, which will tell us what were the

SQL> select begin_snap_id, end_snap_id, start_time, end_time, filename
from caw_extract_metadata 
where extract_id=(select max(extract_id) 
from caw_extract_metadata);
502 524
23-MAR-16 10.43.14.024255 AM
23-MAR-16 10.44.27.319536 AM
1_2EB95980AB33561DE053057AA8C04903_3695123233_502_524.dmp

So we can see that per the metadata table, the ETL BELIEVES it’s already loaded the snapshots from 502-524.

We’ll now query the PROPERTIES table that tells us where our dump files are EXTRACTED TO:

SQL> select * from caw_extract_properties
 2 where property_name='dump_dir_1';
dump_dir_1
/u01/app/oracle/product/agent12c/agent_inst
ls /u01/app/oracle/product/agent12c/agent_inst/*.dmp
1_2EB95980AB33561DE053057AA8C04903_3695123233_502_524.dmp

So here is our problem.  We have a dump file that was created, but never performed the agent to agent push or load to the AWR Warehouse.  As the source table was updated with the rows to the METADATA table, it now fails to load these rows.

Steps to Correct

  1. Clean up the dump file from the datapump directory
  2. Update the METADATA table
  3. Rerun the job
cd /u01/app/oracle/product/agent12c/agent_inst
rm 1_2EB95980AB33561DE053057AA8C04903_3695123233_502_524.dmp

Note: You can also choose to rename the extension in the file if you wish to retain it until you are comfortable that everything is successfully loading, but be aware of size constraints in your $AGENT_HOME directory.  I’ve seen issues due to space constraints.

Log into the database and remove the latest row update in the metadata table:

select extract_id from caw_extract_metadata
where being_snap_id=502 and end_snap_id=504;
101
delete from caw_extract_metadata where extract_id=101;
1 row deleted.
commit;

Log into your AWR Warehouse dashboard and run the manual Upload Snapshots Now for the database again.

awrw4


Tags:  , , ,

Del.icio.us
Facebook
TweetThis
Digg
StumbleUpon


Copyright © DBA Kevlar [AWR Warehouse Fails on Upload- No New Snapshots], All Right Reserved. 2016.

Gold Agent Image

$
0
0

The Gold Agent Image is going to simplify agent management in EM13c, something a lot of folks are going to appreciate.

django

First step to using this new feature is to create a image to be used as your gold agent standard.  This should be the agent that is the newest, most up to date and patched agent that you would like your other agents to match.

Managing Gold Images

You can access this feature via your cloud control console from the Setup menu, Manage Cloud Control, Gold Agent Images.

If it’s the first time you’re accessing this, you’ll want to click on Manage all Images button in the middle, right hand side to begin.

The first thing you’ll do is click on Create and the will begin the step to build out your shell for your gold image.

agent2

The naming convention requires underscores between words and can accept periods, which is great to keep release versions straight.

agent1

Type in a description, choose the Platform, which pulls from your software library and then click Submit.

You’ve now created your first Gold Agent Image for the platform you chose from the drop down before clicking Submit.

agent4

The Gold Agent Dashboard

Now let’s return to Gold Agent Images by clicking on the link that you see above on the left hand side of the above screen.

As this environment only has one agent to update, it matches what I have in production and says everything is on the gold agent image.

gaig

You may want to know where you go from here- There are a number of ways to manage and use Gold Agent Images for provisioning.  I’ve covered much of it in this post.

You may be less than enthusiastic about all this clicking in the user interface.  We can avoid that with incorporating the Enterprise Manager Command Line Interface, (EMCLI) into the mix.  The following commands can be issued from any host with the EMCLI installed.

Subscribing and Provisioning Via the EMCLI

The syntax to subscribe agents to an existing Gold Agent Image from my example from above to two hosts, would be:

$<OMS_HOME>/bin/emcli subscribe_agents -image_name="AgentLinux131000" -agents="host1.us.oracle.com:1832,host2.us.oracle.com:1832"

Or if the agents belong to an Admin group, then I could deploy the Gold Agent Image to all the agents in a group by running the following command from the EMCLI on the OMS host:

$<OMS_HOME>/bin/emcli subscribe_agents -image_name="AgentLinux131000" -groups="Admin_dev1,Admin_prod1"

The syntax to provision the new gold agent image to a host(s) is:

<ORACLE_HOME>/bin/emcli update_agents -gold_image_series="Agent13100" -version_name="V1" agents="host1.us.oracle.com:1832,host2…"

Status’ of provisioning jobs can be checked via the EMCLI, as can other tasks.  Please see Oracle’s documentation to see more cool ways to use the command line with the Gold Agent Image feature!


Tags:  , ,

Del.icio.us
Facebook
TweetThis
Digg
StumbleUpon


Copyright © DBA Kevlar [Gold Agent Image], All Right Reserved. 2016.

How to Find Information in the OMR, (Enterprise Manager Repository)

$
0
0

I get a lot of questions starting with, “Where do I find…” and end with “in the Oracle Management Repository, (OMR)?”

confused_lost

The answer to this is one that most DBAs are going to use, as it’s no different than locating objects in most databases, just a few tricks to remember when working with the OMR.

  1.  SYSMAN is the main schema owner you’ll be querying in an OMR, (although there are others, like SYSMAN_RO and others.)
  2. Most views you will be engaging with when querying the OMR start with MGMT or MGMT$.
  3. DBA_TAB_COLUMNS is your friend.
  4. Know the power of _GUID and _ID columns in joins.

Using this information, you can answer a lot of questions when trying to figure out a command you’re seen but don’t have your specific syntax and need to know where to get it from.

Getting Info

As a working example, someone asked me today how they would locate what platform # is used for their version of Linux?  The documentation referred to a command that listed one, but they couldn’t be sure if it was the same one that they were deploying.

So how would we find this?

./emcli <insert command here>
 -platform=?


select table_name from dba_tab_columns
where owner='SYSMAN'
and table_name like 'MGMT%'
and column_name='PLATFORM_NAME';

This is going to return 5 rows and trust me, pretty much all of them are going to have the PLATFORM_ID  along with that PLATFORM_NAME  one way or another in it.  There are a few that stand out that with a little logic, make sense:

TABLE_NAME
--------------------------------------------------------------------------------
MGMT_ARU_PLATFORMS_E
MGMT$ARU_PLATFORMS
MGMT$EM_LMS_ACT_DATA_GUARD_VDB
MGMT_ARU_PLATFORMS
MGMT_CCR_HOST_INFO
SQL> select distinct(platform_name), platform_id from sysman.mgmt$aru_platforms
 2 order by platform_id;
PLATFORM_NAME PLATFORM_ID
---------------------------------------- -----------
HP OpenVMS Alpha 89
Oracle Solaris on x86 (32-bit) 173
HP-UX Itanium 197
Microsoft Windows Itanium (64-bit) 208
IBM: Linux on System z 209
IBM S/390 Based Linux (31-bit) 211
IBM AIX on POWER Systems (64-bit) 212
Linux Itanium 214
Linux x86-64 226
IBM: Linux on POWER Systems 227
FreeBSD - x86 228

The person who posted the question was looking for the Platform_ID for Linux x86-64, which happens to be 226.

Summary

I’d always recommend checking views, as they may be in reserve for plugins or management packs that haven’t been deployed or used before counting on data, but there’s a lot that you can find out even if it isn’t in the GUI.

We’re DBAs, we love data and there’s plenty of that in the OMR for EM13c.


Tags:  ,

Del.icio.us
Facebook
TweetThis
Digg
StumbleUpon


Copyright © DBA Kevlar [How to Find Information in the OMR, (Enterprise Manager Repository)], All Right Reserved. 2016.

EM13c Cloning- Part II, Demands from Test Master and Kellyn

$
0
0

On my previous post, I submitted a job to create a test master database in my test environment.  Now my test environment is a sweet offering of containers that simulate a multi-host scenario, but in reality, it’s not.

me

I noted that after the full copy started, my EMCC partially came down, as did my OMR, requiring both to be logged into and restarted.

Upon inspection of TOP on my “host” for my containers, we can see that there is some serious CPU usage from process 80:

 PID USER PR NI VIRT RES SHR S %CPU %MEM TIME+ COMMAND
 80 root 20 0 0 0 0 R 100.0 0.0 134:16.02 kswapd0
24473 oracle 20 0 0 0 0 R 100.0 0.0 40:36.39 kworker/u3+

and that this is Linux process is managing the swap, (good job, Kellyn! :))

$ ps -ef | grep 80
root 80 2 0 Feb16 ? 02:14:36 [kswapd0]

The host is very slow to respond and is working hard.  Now what jobs are killing it so?  Is it all the test master creation?

test_m1

Actually, no, remember, this is Kellyn’s test environment, so I have four databases that are loading to a local AWR Warehouse and these are all container environments sharing resources.

I have two failed AWR extract jobs due to me overwhelming the environment and can no longer get to my database home page to even remove them. I had to wait for a bit for the main processing to complete before I could even get to this.

As it got closer to completing the work of the clone,I finally did log into the AWR Warehouse, removed two databases and then shut them down to free up resources and space.  We can then see the new processes for the test master, owned by 500 instead of showing as the oracle OS user as they’re running on a different container than the one I’m running the top command from:

24473 root 20 0 0 0 0 R 100.0 0.0 52:23.17 kworker/u3+
15682 500 20 0 2456596 58804 51536 R 98.0 0.2 50:07.48 oracle_248+
 5034 500 20 0 2729304 190600 181552 R 91.1 0.8 8:59.36 ora_dbw0_e+
 2946 500 20 0 2802784 686440 626148 R 86.8 2.8 3:15.62 ora_j019_e+
 5041 500 20 0 2721952 19644 17612 R 68.6 0.1 6:36.20 ora_lg00_e+

It looks a little better thou as it starts to recover from me multi-tasking too much at once.  After a certain amount of time, the test master was finished and up:

test_m2

I did get it to the point during the clone where there was no swap left:

KiB Mem : 24423596 total, 178476 free, 10595080 used, 13650040 buff/cache
KiB Swap: 4210684 total, 0 free, 4210684 used. 1148572 avail Mem

They really should just cut me off some days… :)

Note:  Followup on this.  Found out upon comparing the host environment to my other environments, the swap was waaaaaay too low.  This is a good example of what will happen if you DON’T have enough swap to perform these types of tasks, like cloning!


Tags:  , ,

Del.icio.us
Facebook
TweetThis
Digg
StumbleUpon


Copyright © DBA Kevlar [EM13c Cloning- Part II, Demands from Test Master and Kellyn], All Right Reserved. 2016.

EM13c Corrective Actions

$
0
0

While at Collaborate 2016, a number of us were surprised that people still aren’t using Corrective Actions and in EM13c, there are a number of cool ones built into the system to make your life easier.  In this post, we’ll use the very valuable, Add Tablespace corrective action to ensure the DBA  is no longer woke up at night, automating the tedious task of adding logical space by extending or adding data files.

sheldon_bed

So let’s talk about how you can stop databases from making you get out of bed to add tablespace… 🙂

Creating the Corrective Action

Most of this corrective action is already build out for you.  All you ave to do is create the corrective action and use the built in from the corrective action library.  Start by clicking on Enterprise -> Monitoring -> Corrective Action Library.  Select the Add Space to Tablespace job and click Go.

TBS3

Name you new Corrective Action, and select the Event Types ‘Metric Alert’.  This ensures that the corrective action only runs when it meets the metric threshold.

Next, click on the Parameters tab to customize how the space should be added, the location of the space and other pertinent information.  Once you’ve finished filling in all of this criteria, click on Save to Library.

tbs4

This Corrective Action isn’t production yet, as with any full development life cycle, the Corrective Action is now set to Draft and you will have to Publish it before it’s available for use.

Highlight the new Corrective Action and click on Publish.  That’s all there is to it.

Utilizing a Corrective Action

Now we need to assign the Corrective Action to a target to be used when it meets the metric threshold criteria.

Clock on Targets -> Databases and choose one of your databases that you wish to set up to use the corrective action.  Once you come to the Oracle Database Home page, click on Oracle Database -> Monitoring -> Metric & Collection Settings.

In the list of metrics, scroll down till you see Tablespace Full.  Choose to edit the metric Tablespace Used (%).

tbs1

At the bottom of the page, you’ll see a section that says All Others  with a radio button, click on Edit.  In the Corrective Actions section, Click on Add next to the Warning row.

tbs2

Leave the default to use the Library and choose your Corrective Action you created earlier to add space.  Ensure you add the correct Named Credentials that will be able to add the space, just as you would use to perform this task in the UI or as a DBA on the host and click Continue.

We’ve set this to perform the Corrective Action at warning, so there is never a time it will reach Critical and hit an out of space issue before it may be able to complete the Corrective Action, ensuring everyone is able to rest without worry!

Ensure you Continue and Save the Changes to your metric settings and that’s all there is to it.  To test the Corrective Action, you can add a small test tablespace to a database, limited size and create a table that maxes it out.  It should add space automatically when it reaches the warning threshold.

Sweet Dreams from Kellyn and your Enterprise Manager 13c!


Tags:  ,

Del.icio.us
Facebook
TweetThis
Digg
StumbleUpon


Copyright © DBA Kevlar [EM13c Corrective Actions], All Right Reserved. 2016.

EM13c- BI Publisher Reports

$
0
0

How much do you know about the big push to BI Publisher reports from Information Publisher reporting in Enterprise Manager 13c?  Be honest now, Pete Sharman is watching…. 🙂

george

I promise, there won’t be a quiz at the end of this post, but its important for everyone to start recognizing the power behind the new reporting strategy.  Pete was the PM over the big push in EM13c and has a great blog post with numerous resource links, so I’ll leave him to quizzing everyone!

IP Reports are incredibly powerful and I don’t see them going away soon, but they have a lot of limitations, too.  With the “harder” push to BI Publisher with EM13c, users receive a more robust reporting platform that is able to support the functionality that is required of an IT Infrastructure tool.

BI Publisher

You can access the BI Publisher in EM13c from the Enterprise drop down menu-

bippub4

There’s a plethora of reports already built out for you to utilize!  These reports access only the OMR, (Oracle EM Management Repository) and cover numerous categories:

  • Target information and status
  • Cloud
  • Security
  • Resource and consolidation planning
  • Metrics, incidents and alerting

bipub3

Note: Please be aware that the license for BI Publisher included with Enterprise Manager only covers reporting against the OMR and not any other targets DIRECTLY.  If you decide to build reports against data residing in targets outside the repository, it will need to be licensed for each.

Many of the original reports that were converted over from IP Reports were done so by a wonderful Oracle partner, Blue Medora, who are well known for their VMware plugins for Enterprise Manager.

BI Publisher Interface

Once you click on one of the reports, you’ll be taken from the EM13c interface to the BI Publisher one.  Don’t panic when that screen changes-  it’s supposed to do that.

bipub4


You’ll notice be brought to the Home page, but you’ll notice that you’ll have access to your catalog of reports, (it will mirror the reports in the EM13c reporting interface) the ability to create New reports, open reports that you may have drafts of or are local to your machine, (not uploaded to the repository) and authentication information.

In the left hand side bar, you will have menu options that duplicate some of what is in the top menu and tips access to help you get more acquainted with BI Publisher-

bipub7

This is where you’ll most likely access the catalog, create reports and download local BIP tools to use on your desktop.

Running Standard Reports


To run a standard, pre-created report, is pretty easy.  This is a report that’s already had the template format created for you and the data sources linked.  Oracle has tried to create a number of reports in categories it thought most IT departments would need, but let’s just run two to demonstrate.

Let’s say you want to know about Database Group Health.  Now there’s not a lot connected to my small development environment, (four databases, three in the Oracle Public Cloud and one on-premise) and this is currently aimed at my EM repository. This limits the results, but as you can see, it shows the current availability, the current number of incidents and compliance violations.bipub1

We could also take a look at what kinds of targets exist in the Enterprise Manager environment:

bipub11

Or who has powerful privileges in the environment:

bipub10

Now this is just a couple of the dozens of reports available to you that can be run, copied, edited and sourced for your own environment’s reporting needs out of the BI Publisher.    I’d definitely recommend that if you haven’t checked out BI Publisher, spend a little time on it and see how much it can do!


Tags:  , ,

Del.icio.us
Facebook
TweetThis
Digg
StumbleUpon


Copyright © DBA Kevlar [EM13c- BI Publisher Reports], All Right Reserved. 2016.

EM13c Proxy Setup, MOS and CSI Setup

$
0
0

The change in EM13c, is that it support multiple proxies, but you may still not know how to set up a proxy and then use it with your MOS credentials and then assign out your CSI’s to targets.

scratcheshead

Proxies

To do this, click on Settings, Proxy Settings, My Oracle Support.  Click on Manual Proxy Setting and then type in your proxy host entry, (sans the HTTPS, that’s already provided for you) and the port to be used:

proxy1

Once entered, click on Test and if successful, then click on Apply.  If it fails, make sure to check the settings with your network administrator and test the new ones offered.  Once you have a proxy that works, you’ll receive the following message:

proxy2

My Oracle Support Credentials

Next, you’ll need to submit your MOS credentials to be used with the EM environment.  Keep in mind, the credentials used for this account, (let’s say you’re logged in as SYSMAN)  will be identified with this EM login unless updated or removed.

Click on Settings, My Oracle Support, My Credentials.  Enter the credentials to be used with this login and click Apply.

proxy3

You’ve now configured MOS credentials to work with the main features of EM13c.

Support Identifier Assignment

Under the same location as the one you set up your MOS credentials, you’ll notice the following drop down:  Support Identifier Assignment.

This option allows you to verify and assign CSI’s to the targets in Oracle Enterprise Manager.  Its a nice inventory features in EM that can save you time as you work with MOS and SR support, too.

proxy4

As you can see from my setup above, I only have a few targets in this EM environment and I was able to do a search of the CSI that is connected to my MOS credentials and then assign it to each of these targets, (whited out.)  If you have more than one CSI, you can assign the appropriate one to the targets that the targets belong to after searching for the target names or by target types you wish to locate.

And that’s the 101 on Proxy, MOS and CSI Setup in EM13c!


Tags:  , , , ,

Del.icio.us
Facebook
TweetThis
Digg
StumbleUpon


Copyright © DBA Kevlar [EM13c Proxy Setup, MOS and CSI Setup], All Right Reserved. 2016.

Enterprise Manager Support Files 101- The EMOMS files

$
0
0

Someone pinged me earlier today and said, “Do I even really need to know about logs in Enterprise Manager?  I mean, it’s a GUI, (graphical user interface) so the logs should be unnecessary to the administrator.”

luke

You just explained why we receive so many emails from database experts stuck on issues with EM, thinking its “just a GUI”.

Log Files

Yes, there are a lot of logs involved with the Enterprise Manager.  With the introduction back in EM10g of the agent, there were more and with the EM11g, the weblogic tier, we added more.  EM12c added functionality never dreamed before and with it, MORE logs, but don’t dispair, because we’ve also tried to streamline those logs and where we weren’t able to streamline, we at least came up with a directory path naming convention that eased you from having to search for information so often.

The directory structure for the most important EM logs are in the $OMS_HOME/gc_inst/em/OMGC_OMS1/sysman/log directory.

Now in many threads on Oracle Support and in blogs, you’ll hear about the emctl.log, but today I’m going to spend some time on the emoms properties, trace and log files.  Now the EMOMS naming convention is just what you would think it’s about-  the Enterprise Manager Oracle Management Service, aka EMOMS.

The PROPERTIES File

After all that talk about logs, we’re going to jump into the configuration files first.  The emoms.properties is in a couple directory locations over in the $OMS_HOME/gc_inst/em/EMGC_OMS1/sysman/config directory.

Now in EM12c, this file, along with the emomslogging.properties file was very important to the configuration of the OMS and it’s logging, which without this, we wouldn’t have any trace or log files or at least the OMS wouldn’t know what to do with the output data it collected!  If you look in the emoms.properties/emomslogging.properties files for EM13c, you’ll receive the following header:

#NOTE
#----
#1. EMOMS(LOGGING).PROPERTIES FILE HAS BEEN REMOVED

Yes, the file is simply a place holder and you now use EMCTL commands to configure the OMS and logging properties.

There are, actually, very helpful commands listed in the property file to tell you HOW to update your EM OMS properties!  Know if you can’t remember an emctl property commands, this is a good place to look to find the command/usage.

The TRACE Files

Trace files are recognized by any DBA-  These files trace a process and for the emoms*.trc files, these are the trace files for EM OMS processes, including the one for the Oracle Management Service.  Know that a “warning” isn’t always a thing to be concerned about.  Sometimes it’s just letting you know what’s going on in the system, (yeah, I know, shouldn’t they just classify that INFO then?”

2016-04-09 01:00:07,523 [RJob Step 62480] WARN jobCommand.JvmdHealthReportJob logp.251 - JVMD Health report job has started

These files do contain more information than the standard log file, but it may be more than what a standard EM administrator is going to search through.  They’re most helpful when working with MOS and I recommend uploading the corresponding trace files if there is a log that support has narrowed in on.

The LOG Files

Most of the time, you’re going to be in this directory, looking at the emctl.og, but remember that the emoms.log is there for research as well.  If you perform any task that involves the OMS and an error occurs, it should be written to the emoms.log, so looking at this log can provide insight to the issue you’re investigating.

The format of the logs are important to understand and I know I’ve blogged about this in the past, but we’ll just do a quick and high level review.  Taking the following entry:

2016-01-12 14:54:56,702 [[STANDBY] ExecuteThread: '1' for queue: 'weblogic.kernel.Default (self-tuning)'] ERROR deploymentservice.OMSInfo logp.251 - Failed to get all oms info

We can see that the log entry starts with timestamp, module, message, status, (ERROR, WARN, INFO) detail, error message.  This simplifies it when having to read these logs or knowing how one would parse them into a log analysis program.

There are other emoms log files, simply specializing in loader processing and startup.  Each of these logs commonly contain a log file with more detailed information about the data its in charge of tracing.

If you want to learn more, I’d recommend reading up on EM logging from Oracle.


Tags:  , ,

Del.icio.us
Facebook
TweetThis
Digg
StumbleUpon


Copyright © DBA Kevlar [Enterprise Manager Support Files 101- The EMOMS files], All Right Reserved. 2016.
Viewing all 31 articles
Browse latest View live